 For my pharmaceutical and biotech customers, sanitary clamps (also called hygienic clamps) keep systems clean while allowing quick disconnects. However, making reliable process system connections is anything but routine. If it isn’t done just right, then the hygienic integrity of the whole process is put in jeopardy. If process media or cleaning solution can escape through an improperly clamped connection, even a tiny drip, then in theory air and bacteria could have entered. You may need to report the incident and scrap the whole batch. This happens more than the industry cares to admit.
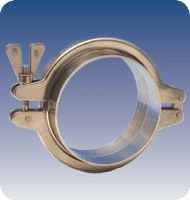
Sure, it helps to have quality sanitary clamps (properly designed and precisely machined like our ASME clamp), but I’ll skip the commercial. What’s really important is the human factor. Technicians and operators need to be trained and re-trained on how to use clamps correctly. This blog post explains the three steps your technicians and operators must know to achieve reliable clamp connections.
Step One: Inspect
The first step is to inspect. Look at the ferrule. I mean really look at it. Is there gasket residue? That will prevent the ferrules from mating evenly. Are there surface imperfections? Manufacturers take measures to deliver smooth, electro-polished ferrules, and one scratch from a screwdriver will ruin the crevice-free surface.
Look at the gasket. Are there tiny cracks and tears? Has it discolored? Is it hard to the point of being brittle? Elastomeric gaskets should be firm but still pliable. Is the gasket the right size? Close doesn’t count. For every ferrule there is one exact size gasket that you should use, to avoid gaps and intrusions.
Look at the clamp. Are there bent components? Are the threads in good shape? Are the hinges loose? Sometimes indentations result from uneven compression, so look carefully.
Inspections are vital because they are the first line of defense against protentional contamination issues. Catching protentional problems now means they do not become even bigger problems down the line.
Step Two: Install
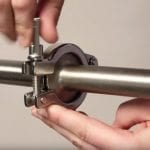
After thoroughly inspecting the hygienic clamp, it is time to install it. This process must be done carefully and accurately. Otherwise, you again risk compromising the clamp’s seal.
Start by positioning the gasket between the ferrule flanges. Make sure that the ferrules are completely aligned, that the gap is proper, and that the clamp is not used to pull pipes or other components into alignment. Rather, align everything before installing the clamp.
Make sure that the gasket bead fits the grooves of both ferrule flange faces. Then, mate the faces together. Both flanges should be within the clamp groove. Ensure that everything is properly aligned, and apply and tighten the clamp.
As the clamp is tightened, it squeezes on the flanges. That pushes that ferrules toward to each other. This process ensures a proper seal, and the clamp connection should end up perfectly aligning the two ferrules. It’s how you achieve a uniform crush on the gasket.
Step Three: Identify
After installing the clamp, it is time to identify if it has been installed correctly and is doing its job.
Make sure that the clamp is neither over- nor under-tightened. Over-tightening can be spotted by checking for clamp jaws that touch. This should not occur because excessive pressure may cause the gasket to intrude into the pipe. Properly tightened hygienic clamps instead have some space between the jaws.
On the other hand, too much space in between the jaws may leave gaps between the gasket and ferrules. This invites the opportunity for the ingress of pathogens or contaminants. Even if they do not cause drips, these gaps can cause hard-to-clean areas to occur that clean-in-place processes cannot reach.
Tighten hygienic clamp jaws with an approved torque tool to ensure that neither over nor under-tightening occurs. Also include inspections of ferrules, gaskets, clamps, and piping as a part of regular maintenance procedures. Changeovers and cleaning routines may mean that conditions have changed. Equipment may travel as a result of vibration, moving pipelines out of alignment.
Knowledge Is Prevention
When installing, storing, or inspecting clamps, ferrules, gaskets, and piping, know what to look for before you start. Don’t risk contamination issues that could jeopardize an entire batch or even people’s health.
L.J. Star’s recently published infographic, “Keep It Clean: How to Install Sanitary Fittings,” provides an easy-to-use visual reference in understanding the procedures and importance of proper sanitary clamp installation.
Subscribe to our Blog

Categories
- Certifications
- Company
- In The News
- Industry Information
- METAGLAS® Sight Glasses
- PackExpo 2020
- Sanitary Clamps
- Sanitary Fittings
- Sight Flow Indicator Benefits
- Sight Glass Applications
- Sight Glass Construction
- Sight Glass Lighting
- Sight Glass Lights
- Sight Glass Process Vessel Camera
- Sight Glasses
- Trade Shows
- Webcast